At a Glance
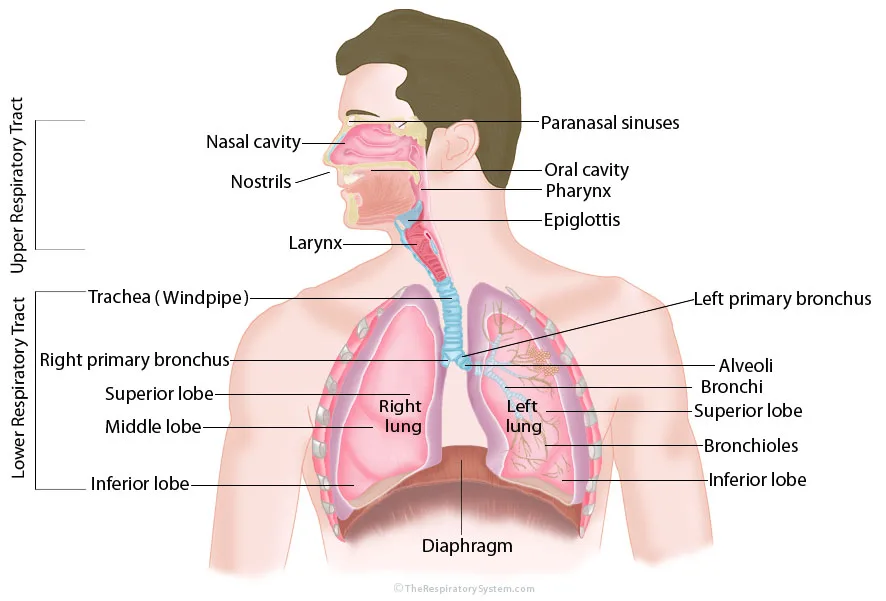
A labeled respiratory system diagram shows the upper respiratory tract (nostrils, nasal cavity, paranasal sinuses, oral cavity, pharynx, epiglottis and larynx) and the lower respiratory tract (trachea, right and left primary bronchi, bronchi, bronchioles, alveoli and the two lungs), with the diaphragm beneath them. The right lung is drawn with three lobes and the left lung with two, and the right lung appears on the viewer's left because the body faces you.
- What it shows
- The airways and lungs from the nostrils to the alveoli, plus the diaphragm
- Usual view
- Front view of the head, neck and chest; side view for the nose and throat
- Upper tract labels
- Nostrils, nasal cavity, paranasal sinuses, oral cavity, pharynx, epiglottis, larynx
- Lower tract labels
- Trachea, primary bronchi, bronchi, bronchioles, alveoli, right and left lungs and their lobes
- Orientation
- Anatomical position: the body's right side is on the viewer's left
- Best used for
- Learning the parts, revision before a test and labeling practice
On this page
- What Is a Respiratory System Diagram?
- Upper Respiratory Tract Diagram: What Does Each Label Mean?
- Lower Respiratory Tract Diagram: What Does Each Label Mean?
- What Does Each Part of the Respiratory System Diagram Do?
- How Do You Label a Respiratory System Diagram?
- How Do You Draw a Simple Respiratory System Diagram?
- How Can You Use a Labeled and Unlabeled Diagram to Study?
- Key Facts
- FAQ
What Is a Respiratory System Diagram?
A respiratory system diagram is a labeled picture of the airways and lungs that shows where each organ sits and the route air takes from the outside world to the blood. The standard version shows the head, neck and chest from the front, with the air-carrying structures drawn in color and the rest of the body left pale so the labels stand out.
Most diagrams divide the system into two brackets. The upper respiratory tract covers the nose, nasal cavity, sinuses, mouth, pharynx and larynx, all in the head and neck. The lower respiratory tract covers the trachea, the bronchi and their branches, and the lungs with their alveoli, all inside the chest.
The main diagram at the top of this page follows that layout. On the left it marks both brackets, and its label lines point to the nasal cavity, nostrils, larynx, trachea, right primary bronchus and the three lobes of the right lung. On the right it labels the paranasal sinuses, oral cavity, pharynx, epiglottis, left primary bronchus, alveoli, bronchi, bronchioles and the two lobes of the left lung, with the diaphragm along the bottom.
Explained simply
Think of the diagram as an upside-down tree with a doorway on top. The doorway is the nose and mouth, the trunk is the windpipe, the big branches are the bronchi, the twigs are the bronchioles and the leaves are the tiny air sacs called alveoli. The curved muscle under the tree, the diaphragm, is the pump that pulls the air in.
Upper Respiratory Tract Diagram: What Does Each Label Mean?
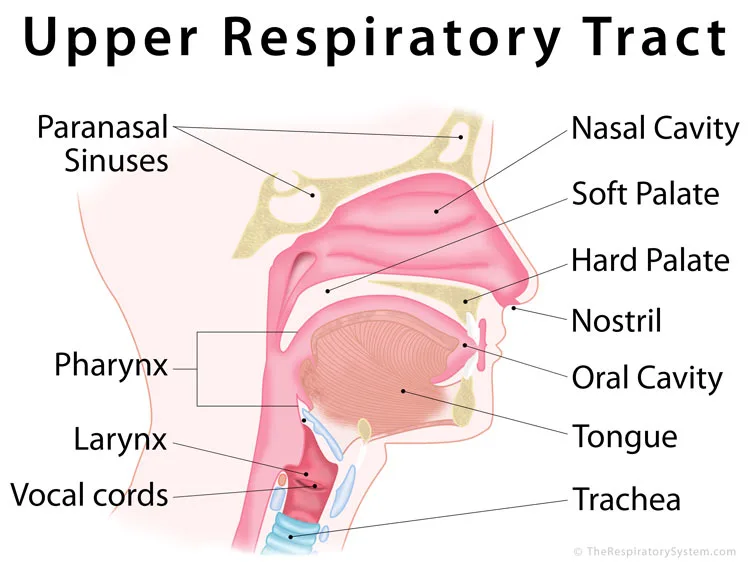
The upper respiratory tract diagram labels the structures of the head and neck that take in air and clean, warm and moisten it before it reaches the chest. The close-up below is a side view cut down the middle of the head, so the inside of the nose, mouth and throat can be seen at once.
- Nostrils. The two openings at the front of the nose where air enters. Coarse hairs just inside the nostrils catch large particles.
- Nasal cavity. The air space behind the nose, split into left and right halves by the nasal septum. The nasal cavity is lined with mucous membrane, and its curled bony shelves, the nasal conchae, swirl the air so it is filtered, warmed and humidified.
- Paranasal sinuses. Air-filled spaces in the frontal, maxillary, ethmoid and sphenoid bones that drain into the nasal cavity. The paranasal sinuses lighten the skull and add resonance to the voice.
- Hard and soft palate. The bony front and muscular back of the roof of the mouth. They separate the nasal cavity from the mouth, and the soft palate lifts during swallowing to seal off the nasopharynx.
- Oral cavity and tongue. The oral cavity is a second entrance for air, used mostly during heavy exercise or when the nose is blocked, but it does not filter or warm air as well as the nose.
- Pharynx. The throat, a muscular tube shared by air and food. The pharynx has three parts from top to bottom: the nasopharynx, oropharynx and laryngopharynx.
- Epiglottis. A leaf-shaped flap of elastic cartilage above the voice box. The epiglottis tips back over the entrance of the larynx during swallowing so food goes into the esophagus instead.
- Larynx and vocal cords. The larynx, or voice box, is a frame of cartilages at the front of the neck that links the pharynx to the trachea. The vocal cords stretched inside it vibrate to make sound.
Diagrams do not all draw the boundary between the tracts in the same place. Most anatomy courses, and our main diagram, put the larynx in the upper tract, while some textbooks and clinical sources start the lower tract at the larynx, which is why the lower tract close-up further down labels it too. Our upper vs lower respiratory tract comparison explains both conventions.
Lower Respiratory Tract Diagram: What Does Each Label Mean?
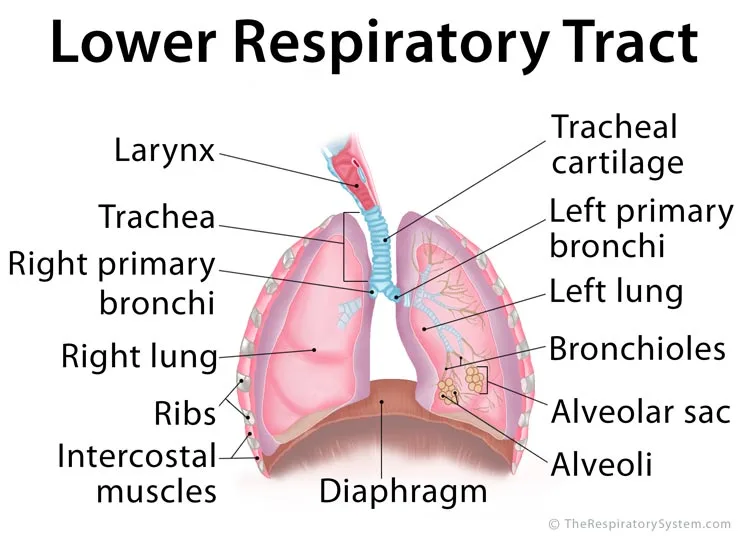
The lower respiratory tract diagram labels the airways and organs inside the chest that carry air to the lungs and exchange gases with the blood. Its labels are easiest to learn in the order that air flows past them.
- Trachea (windpipe). A tube about 10 to 12 cm long in adults, held open by 16 to 20 C-shaped rings of hyaline cartilage. The ringed blue tube in the middle of the diagram is the trachea, and the label "tracheal cartilage" points to those rings.
- Right and left primary bronchi. The trachea splits at a ridge called the carina into two main bronchi, one for each lung. The right primary bronchus is wider, shorter and more vertical than the left one.
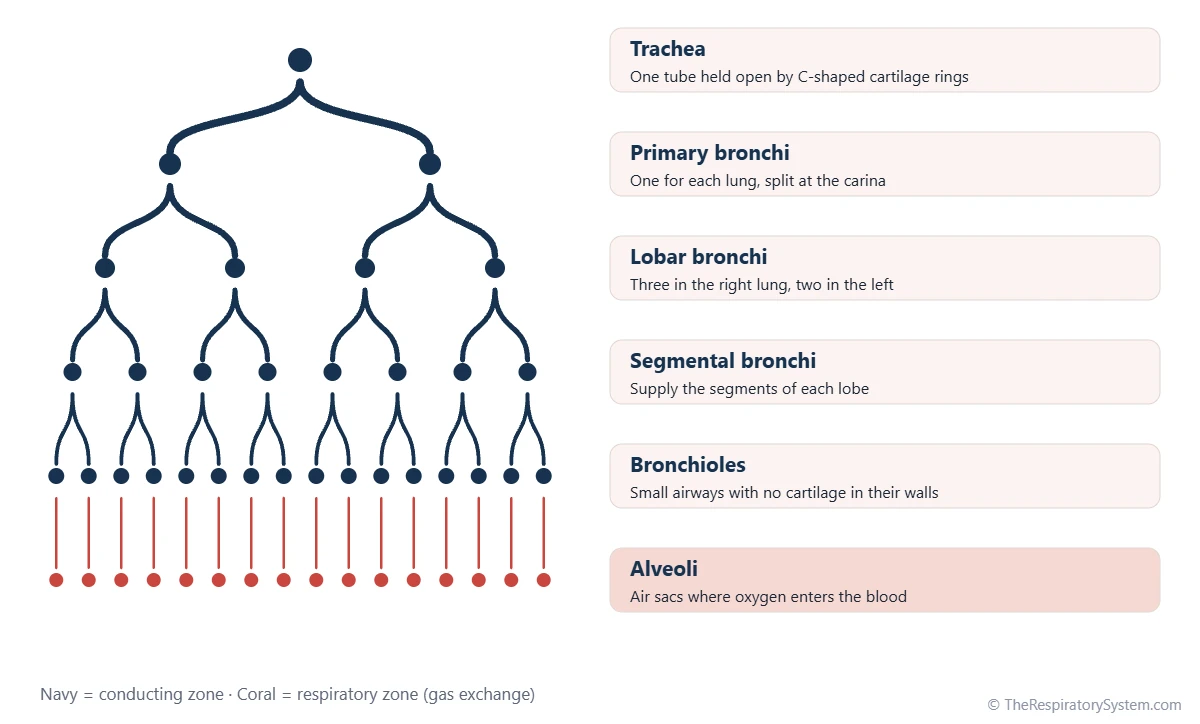
- Bronchi and bronchioles. Inside each lung the primary bronchi divide into lobar and segmental bronchi and then into bronchioles, small airways that have no cartilage in their walls.
- Alveoli and alveolar sacs. The smallest bronchioles end in grape-like clusters of air sacs. Adult lungs hold about 300 to 500 million alveoli, and their thin walls are where gas exchange takes place.
- Right and left lungs. The right lung has three lobes (superior, middle and inferior) and the left lung has two (superior and inferior), because the left lung shares space with the heart. See our page on the lung lobes for the fissures that separate them.
- Ribs and intercostal muscles. The rib cage shields the lungs, and the intercostal muscles between the ribs raise and lower it during breathing.
- Diaphragm. The dome-shaped sheet of muscle under the lungs. When the diaphragm contracts it flattens, the chest gets larger and air flows in.
A whole-body diagram can only hint at the smallest airways, so the bronchioles and alveoli are usually drawn as a magnified patch on one lung. The branching chart below fills that gap by listing the main airway levels from the trachea down to the air sacs.
What Does Each Part of the Respiratory System Diagram Do?
Each labeled part either conducts air, cleans and conditions it, protects the airway, makes sound, exchanges gases or powers breathing. The table below pairs every common label with its location on the diagram and its main job, which is the format most class worksheets ask for under "respiratory system diagram and functions".
Two groups are worth remembering. From the nostrils to the smallest terminal bronchioles, the parts form the conducting zone, which moves and conditions air but exchanges no gases. The respiratory zone begins where alveoli start to appear in the airway walls and ends in the alveolar sacs, and it is the only place where oxygen enters the blood.
The diaphragm, ribs and intercostal muscles are not airways at all, yet diagrams include them because breathing is impossible without them. For a fuller account of what the system does as a whole, including smell, speech and the control of blood pH, see our guide to respiratory system functions.
| Label | Where it is on the diagram | Main function |
|---|---|---|
| Nostrils | Front of the nose, lowest label on the face | Let air in; hairs trap large particles |
| Nasal cavity | Behind the nose, above the roof of the mouth | Filters, warms and humidifies inhaled air |
| Paranasal sinuses | In the skull bones above and beside the nasal cavity | Lighten the skull, make mucus and add voice resonance |
| Oral cavity | The mouth, below the nasal cavity | Second airway entrance, used mostly during hard breathing |
| Pharynx | Tube behind the nose and mouth | Carries air to the larynx and food to the esophagus |
| Epiglottis | Flap at the top of the larynx, behind the tongue | Covers the larynx during swallowing |
| Larynx | Front of the neck, above the trachea | Holds the vocal cords and guards the lower airway |
| Trachea | Ringed tube from the neck into the chest | Carries air to the bronchi and keeps the airway open |
| Primary bronchi | Where the trachea splits, one entering each lung | Carry air into the right and left lungs |
| Bronchi | Branches inside each lung | Distribute air to the lobes and segments |
| Bronchioles | Thin branches deep in the lungs | Carry air to the alveoli and adjust airflow |
| Alveoli | Tiny sacs at the ends of the bronchioles | Exchange oxygen and carbon dioxide with the blood |
| Right lung | Viewer's left side, three lobes | Gas exchange; the larger of the two lungs |
| Left lung | Viewer's right side, two lobes | Gas exchange; leaves room for the heart |
| Diaphragm | Dome-shaped muscle under the lungs | Main breathing muscle; contracts to draw air in |
| Source: Standard human anatomy, our editors | ||
How Do You Label a Respiratory System Diagram?
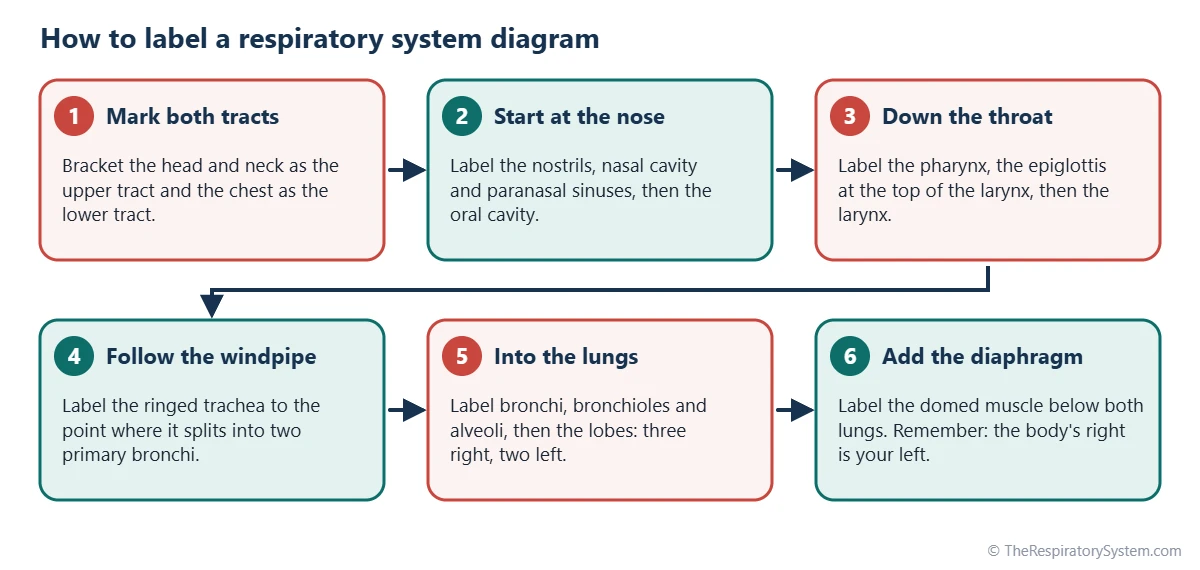
The most reliable way to label a respiratory system diagram is to follow the path of a breath, starting at the nostrils and finishing at the alveoli and diaphragm, so that every label comes in a logical order and none is skipped. Use the steps below on a blank diagram, then check your answers against the labeled one at the top of the page.
- Mark the two tracts. Draw one bracket beside the head and neck for the upper tract and one beside the chest for the lower tract.
- Start at the nose. Label the nostrils and the nasal cavity, then the paranasal sinuses in the bones above and beside it.
- Add the mouth and throat. Label the oral cavity, then the pharynx where the nasal and oral airways meet behind the tongue.
- Find the voice box. Label the epiglottis at the top of the larynx and the larynx itself just below it.
- Follow the windpipe. Label the trachea down to the point where it splits into the right and left primary bronchi.
- Branch into the lungs. Label the bronchi, the narrower bronchioles and the alveoli at the ends of the branches.
- Name the lungs and lobes. Label the right lung with superior, middle and inferior lobes and the left lung with superior and inferior lobes.
- Finish with the diaphragm. Label the dome-shaped muscle under both lungs.
Common labeling mistakes
- Swapping right and left. Diagrams use anatomical position, so the body's right lung is on your left.
- Placing a middle lobe on the left lung. Only the right lung has one.
- Mixing up the pharynx and larynx. The pharynx is the shared throat; the larynx is the cartilage voice box in front of it.
- Pointing the epiglottis line at the tongue. The epiglottis sits behind the tongue, at the top of the larynx.
- Labeling the bronchioles near the trachea. Bronchioles are the thin airways deep inside the lung.
How Do You Draw a Simple Respiratory System Diagram?
A simple respiratory system diagram can be drawn in pencil in a few minutes by sketching a side outline of the head, a straight trachea, two lungs that branch like a tree and a curved diaphragm, then adding label lines on both sides. Neat label lines matter more than artistic detail, and most school mark schemes award points for correct labels rather than shading.
- Draw the outline of a head and neck facing sideways, with a curved nasal cavity above the mouth.
- Draw the pharynx as a tube running down behind the nose and mouth, joining a short, wider larynx at the front of the neck.
- Extend the trachea straight down into the chest and add a few horizontal stripes for its cartilage rings.
- Split the trachea into two primary bronchi, then draw smaller branches spreading into each lung like the twigs of a tree.
- Draw two lungs around the branches. Make the left lung (on the viewer's right) slightly narrower, with a small notch for the heart.
- Add a small cluster of circles at the end of one branch to show the alveoli.
- Draw a curved line under both lungs for the diaphragm.
- Rule straight label lines that do not cross, and write the names neatly at the ends.
For an easy class diagram, the minimum label set is usually the nasal cavity, pharynx, larynx, trachea, bronchi, bronchioles, lungs, alveoli and diaphragm. Older students are often also asked for the epiglottis, the lobes of each lung, the ribs and the intercostal muscles.
How Can You Use a Labeled and Unlabeled Diagram to Study?
The best way to study with a respiratory system diagram is to learn the labeled version first, then test yourself on an unlabeled copy until you can fill in every name without looking. Covering the labels with sticky notes or strips of paper turns the diagram above into a blank diagram in seconds.
- Trace the airflow. Say each part aloud as you trace a breath from the nostrils to the alveoli, then trace it back out. Our pathway of air page walks through the same route in detail.
- Group the labels. Sort the names into upper tract, lower tract and breathing muscles, then into conducting zone and respiratory zone.
- Add one function per label. Write a three or four word job next to each name, such as "warms and filters air" for the nasal cavity.
- Practice with worksheets. Our respiratory system worksheets include fill-in labeling, matching and sequencing tasks with an answer key.
- Test yourself. The respiratory system quiz mixes labeling questions with questions about how breathing works.
- Build it in 3D. A balloon lung model shows the diaphragm and lungs in action.
Younger learners can start with the shorter label set on the respiratory system for kids page and add the extra labels as they grow more confident.
Key Facts
- A labeled respiratory system diagram shows the upper respiratory tract in the head and neck and the lower respiratory tract in the chest.
- Diagrams are drawn in anatomical position, so the body's right lung appears on the viewer's left.
- The right lung is labeled with three lobes and the left lung with two, because the left lung shares space with the heart.
- The trachea is drawn with C-shaped cartilage rings, typically 16 to 20 of them, and divides into the right and left primary bronchi.
- Alveoli are shown as a magnified cluster because the real air sacs, about 300 to 500 million of them, are too small to draw at full-body scale.
- The diaphragm and intercostal muscles appear on most diagrams even though they are muscles rather than airways, because they power breathing.
- Labeling in the order air flows, from the nose to the alveoli, is the easiest way to remember every part.
Frequently Asked Questions
How many parts are labeled on a respiratory system diagram?
There is no fixed number. A simple school diagram usually labels about nine parts: the nasal cavity, pharynx, larynx, trachea, bronchi, bronchioles, lungs, alveoli and diaphragm. A detailed anatomy diagram adds the nostrils, paranasal sinuses, oral cavity, epiglottis, both primary bronchi, the five lung lobes, the ribs and the intercostal muscles, which brings the total to around twenty labels.
Why is the right lung on the left side of the diagram?
Anatomy diagrams are drawn in anatomical position, as if the person is standing and facing you. Their right side is therefore on your left, exactly as when you look at someone across a table. The quickest check is the lobes: the lung with three lobes, including a middle lobe, is always the right lung, wherever it appears on the page.
Is the diaphragm part of the respiratory system?
Yes. The diaphragm is a skeletal muscle rather than an airway, but it is the main muscle of breathing and is included on almost every respiratory system diagram. When it contracts it flattens and enlarges the chest cavity, which lowers the pressure inside the lungs so air flows in. When it relaxes, the lungs recoil and air flows back out.
What is the difference between a labeled and an unlabeled respiratory system diagram?
A labeled diagram names each structure with a line pointing to it and is used for learning. An unlabeled or blank diagram shows the same drawing with empty label lines or numbers, and is used to test whether you can name each part from memory. Teachers often hand out the unlabeled version first and the labeled version afterward as the answer key.
What should a class 10 respiratory system diagram show?
A class 10 human respiratory system diagram normally shows the nasal cavity, pharynx, larynx, trachea with its cartilage rings, bronchi, bronchioles, both lungs, alveoli and the diaphragm, often with the ribs drawn around the lungs. Many syllabuses also ask for a magnified alveolus with blood capillaries around it, to show where oxygen and carbon dioxide are exchanged.
Why is there a gap between the two lungs on the diagram?
The space between the two lungs is the mediastinum, which holds the heart, great blood vessels, esophagus and part of the trachea. Diagrams usually leave it empty so the airways stand out. The left lung is drawn a little narrower, often with a small notch on its inner edge called the cardiac notch, because the heart sits slightly to the left of the midline.
Why are the mouth and oral cavity labeled if we breathe through the nose?
The nose is the main entrance for air at rest because it filters, warms and moistens the air. The mouth is a second entrance that takes over during hard exercise, when the nose is blocked or while speaking, so diagrams label the oral cavity as part of the upper airway. Both routes meet in the pharynx before air continues to the larynx.
Keep Exploring


