At a Glance
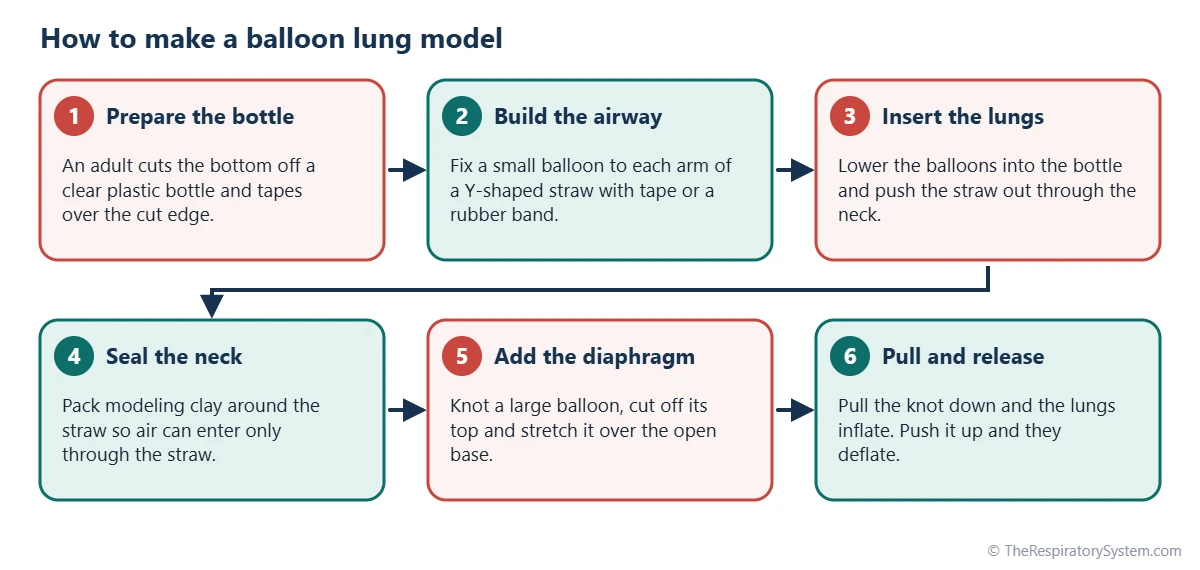
To make a balloon lung model, an adult cuts the bottom off a clear plastic bottle, two small balloons are fixed to a Y-shaped straw and placed inside, the bottle neck is sealed with modeling clay, and a large balloon is stretched over the open bottom as a diaphragm. Pulling the diaphragm down enlarges the space in the bottle, lowers the pressure and makes the balloons inflate; pushing it up deflates them.
- What it shows
- How the diaphragm changes chest volume and pressure to move air in and out
- Represents
- Bottle = chest, balloons = lungs, straw = trachea and bronchi, rubber sheet = diaphragm
- Materials
- Clear plastic bottle, balloons, straws or a Y-connector, modeling clay, tape, scissors
- Level
- Upper elementary to high school science; works as a demonstration or group build
- Key idea
- Larger volume means lower pressure, so air flows in (Boyle's law)
- Main limit
- The bottle is rigid, so it cannot show the ribs and chest wall moving
On this page
- What Is a Lung Model and What Does It Show?
- What Materials Do You Need for a Balloon Lung Model?
- How Do You Make a Lung Model With a Balloon and Bottle?
- How Does the Balloon Lung Model Work?
- What Does Each Part of the Lung Model Represent?
- What Are the Limits of a Balloon Lung Model?
- What Other Respiratory System Project Ideas Work Well?
- How Can You Use the Lung Model in Class?
- Key Facts
- FAQ
What Is a Lung Model and What Does It Show?
A lung model is a physical copy of the chest that demonstrates how a change in chest volume moves air into and out of the lungs. The balloon-and-bottle version is the most popular respiratory system project because it uses cheap materials and makes an invisible process, the pressure change inside the chest, easy to see.
There are three common versions. The simplest uses one balloon on a single straw and shows only that the lungs fill when the diaphragm moves down. The two-balloon version adds a Y-shaped straw, so it also shows the trachea splitting into the two main bronchi. A labeled respiratory system model, built from clay or foam, shows the anatomy but does not move.
This page explains the two-balloon version step by step, because it shows both the structure and the mechanism of breathing in a single build.
Explained simply
Your lungs cannot suck air in on their own. Instead, the muscle under them, the diaphragm, pulls down and makes the space around them bigger. Air from outside then rushes in to fill that space, and the lungs swell up like the balloons in the bottle.
What Materials Do You Need for a Balloon Lung Model?
A balloon lung model needs a clear plastic bottle, two small balloons, one larger balloon, a straw or Y-shaped connector, modeling clay, tape and scissors, most of which are already in a classroom or kitchen. The table below lists each item with the body part it stands for.
A few choices make the model work better. A small to medium bottle with fairly rigid walls holds its shape when the diaphragm is pulled, while a very thin bottle crumples. Small balloons that inflate easily give a more dramatic result than thick party balloons. A plastic Y-connector from a craft or aquarium supply store gives the neatest airway, but two straws taped together into a Y shape work too.
If anyone in the group is allergic to latex, use latex-free balloons and a piece of a nitrile glove or a plastic sheet for the diaphragm instead.
| Material | What it represents | Tips |
|---|---|---|
| Clear plastic bottle | Chest wall and rib cage | Choose a small to medium bottle with firm walls so it keeps its shape |
| Air sealed inside the bottle | Chest (thoracic) cavity | Must be airtight, or the balloons will not move |
| Long straw | Trachea (windpipe) | A wide straw lets air flow more easily |
| Y-connector or two short straws | Right and left main bronchi | Tape the joints of homemade straw branches well |
| Two small balloons | Right and left lungs | Thin balloons that inflate easily work best |
| Large balloon or rubber sheet | Diaphragm | Cut off the top and stretch it tightly over the base |
| Modeling clay | Airtight seal of the closed chest | Press it firmly around the straw in the bottle neck |
| Tape and small rubber bands | Airtight joints | Use them on the balloons and around the base |
| Scissors | Tool only | An adult cuts the bottle and tapes the cut edge |
| Marker or paper flags | Labels | Label the five main parts after testing |
| Source: Standard classroom design, our editors | ||
How Do You Make a Lung Model With a Balloon and Bottle?
To make the model, you build a two-balloon airway, seal it inside a bottle with the bottom cut off, and stretch a balloon across the open base as a diaphragm, which takes about one class period including testing. Follow the steps in order, because the seals are much easier to make before the diaphragm goes on.
- Prepare the bottle. An adult cuts the bottom off a clear plastic bottle, about a third of the way up, and covers the cut edge with tape so it is smooth.
- Make the airway. Use a Y-connector, or tape two short straws to the end of a longer straw to form a Y. The long straw is the trachea and the two short arms are the bronchi.
- Attach the lungs. Slide a small balloon over the end of each short arm and wrap tape or a small rubber band around it so it is airtight.
- Insert the lungs. Lower the balloons into the bottle from the cut end and push the long straw up through the bottle neck until it sticks out at the top.
- Seal the neck. Pack modeling clay firmly around the straw in the bottle neck. Air must be able to enter only through the straw.
- Make the diaphragm. Tie a knot in the neck of a large balloon, then cut off the round top end. Stretch the remaining rubber over the open bottom of the bottle with the knot hanging in the middle.
- Seal the base. Wrap tape around the edge where the rubber meets the bottle so no air can leak in.
- Test it. Hold the bottle upright and gently pull the knot down. The two small balloons should inflate. Push the knot back up and they should deflate.
- Label the parts. Use a marker or small paper flags to label the trachea, bronchi, lungs, chest cavity and diaphragm.
If the balloons barely move, the model is leaking. Press more clay around the straw, check the tape around each small balloon and tighten the seal at the base, then test again.
How Does the Balloon Lung Model Work?
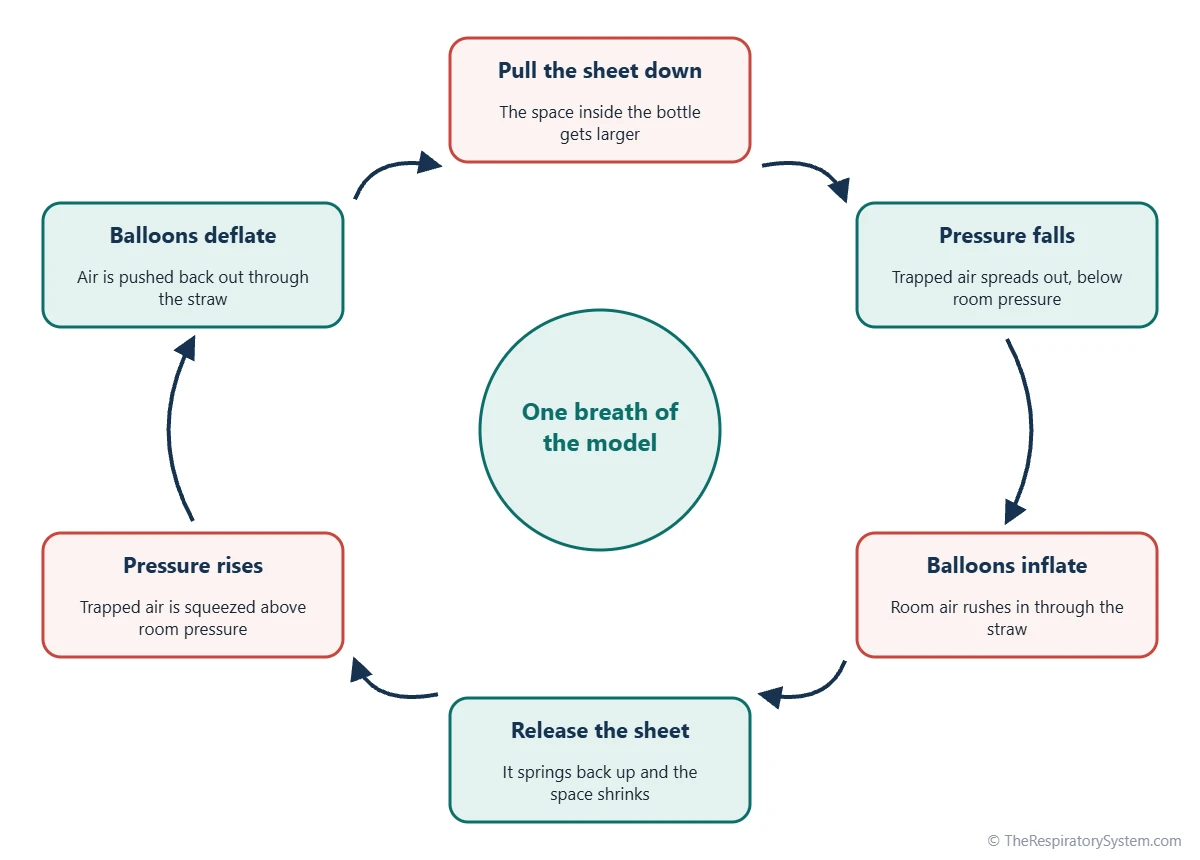
The balloon lung model works because pulling the diaphragm down enlarges the sealed space inside the bottle, which lowers the air pressure around the balloons, so outside air pushes in through the straw and inflates them. This is Boyle's law: at a constant temperature, when the volume of a trapped gas increases, its pressure falls.
The air inside the balloons is connected to the room through the straw, so it stays at room pressure. The air around the balloons, inside the bottle, is trapped. When the rubber sheet moves down, that trapped air spreads into a larger space and its pressure drops below room pressure, so the balloons are pushed outward from inside and fill with air.
Releasing or pushing the sheet up reverses every step. The trapped space shrinks, its pressure rises above room pressure, the balloons are squeezed and air flows back out through the straw. The cycle diagram below follows one full breath of the model.
Your body does the same thing. During inhalation the diaphragm contracts and flattens while the intercostal muscles lift the ribs, so the chest cavity grows and air flows in through the airways. During quiet exhalation the muscles relax and the elastic lungs recoil.
What Does Each Part of the Lung Model Represent?
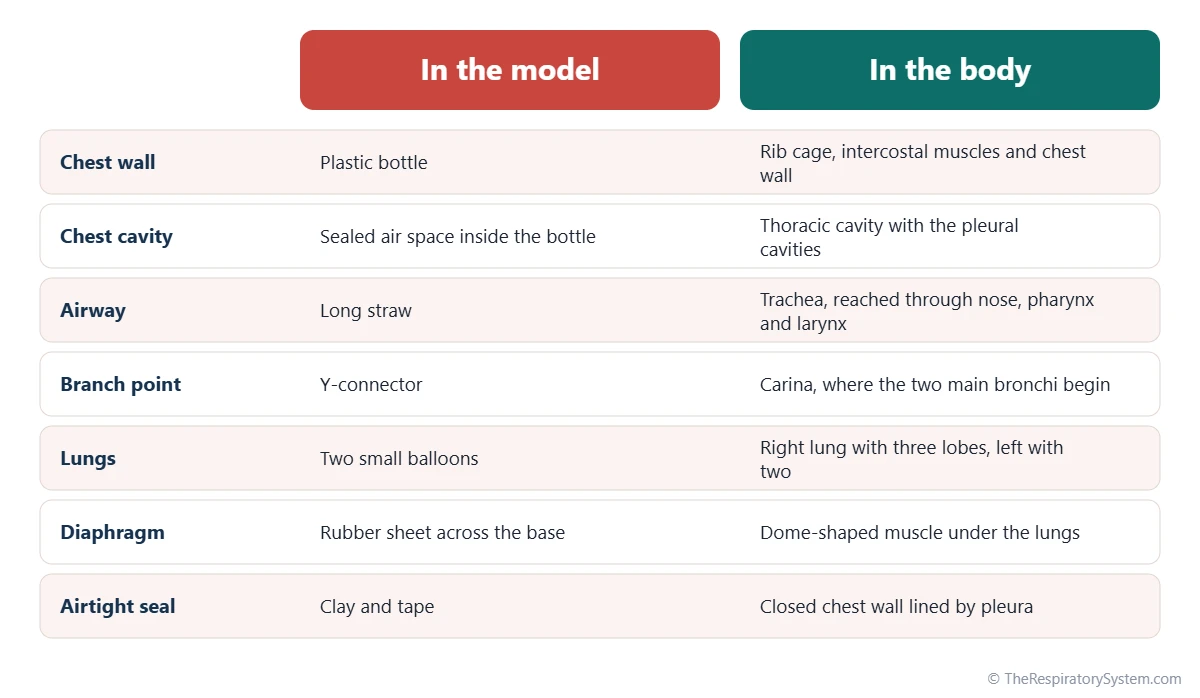
Each part of the lung model stands for one part of the real breathing system: the bottle is the chest wall and rib cage, the space inside it is the chest cavity, the straw is the trachea, the Y-connector is the split into the bronchi, the small balloons are the lungs and the rubber sheet is the diaphragm. The comparison chart below lines them up side by side.
The point where the straw divides matches the carina, the ridge inside the trachea where it branches into the right and left main bronchi. The clay seal plays the role of the closed, airtight chest: in the body, the only way for air to reach the lungs is through the airways, just as the only way into the balloons is through the straw.
The real airway starts much higher, at the nose and mouth, and passes through the pharynx and larynx before it reaches the trachea. The open top of the straw stands in for all of these upper airway parts at once.
What Are the Limits of a Balloon Lung Model?
The balloon lung model shows the pressure principle of breathing well, but it simplifies the anatomy in several important ways, and naming those differences is an excellent test of understanding. Asking students to find what the model gets wrong often teaches more than the build itself.
- The chest wall does not move. The bottle is rigid, but a real rib cage moves up and out as the intercostal muscles contract.
- The diaphragm has the wrong shape. The real diaphragm is a dome that flattens as it contracts; in the model a flat sheet is pulled into a downward bulge, and it moves only because you pull it.
- There is a big air gap. Real lungs fill the chest. The pleural cavity around them holds only a thin film of fluid that keeps the lungs pressed against the chest wall.
- The lungs are empty bags. Real lungs are spongy, filled with a branching bronchial tree that ends in about 300 to 500 million alveoli.
- There is no gas exchange. The model moves air but has no blood vessels, so it cannot show oxygen entering the blood.
- Breathing out works differently. In the body, quiet breathing out happens mostly because the stretched lungs recoil by themselves, not because something pushes the diaphragm up.
- The two sides are identical. The real right lung has three lobes and the left lung two, and the left is smaller to make room for the heart.
What Other Respiratory System Project Ideas Work Well?
Good respiratory system project ideas either show a structure in three dimensions or demonstrate a process, and the strongest projects pair a model with a short labeled explanation of what it shows. These ideas suit science fairs, class displays and homework projects.
- Labeled respiratory system model. Build the airway and lungs from modeling clay or craft foam on a board and label each part from the nostrils to the diaphragm, using our labeled respiratory system diagram as a guide.
- Bronchial tree. Twist pipe cleaners into a tree that branches again and again, then add small clusters of beads or pom-poms at the tips for the alveoli.
- Alveoli cluster. Use a bunch of small balloons or grapes on a stem to show why many tiny sacs give a much bigger surface than one large bag.
- Moving rib cage. Join cardboard ribs to a cardboard spine and breastbone with paper fasteners and rubber bands to show how the ribs swing up and out.
- Mucus and cilia demonstration. Show how a sticky surface traps fine powder, then link it to how the airway lining clears dust, as explained on our cilia and mucus page.
Combining the balloon model with the moving rib cage is a neat way to fix the model's biggest limit, the rigid chest wall.
How Can You Use the Lung Model in Class?
The lung model works best when students predict what will happen before each pull, explain the result in terms of volume and pressure, and then compare the model with a real labeled diagram. Small groups of two or three can each build one model in a single lesson.
- Predict: ask what will happen to the balloons when the sheet is pulled down, and why.
- Observe: pull and release slowly several times and describe the balloons each time.
- Explain: write one sentence linking chest volume, air pressure and airflow.
- Compare: list three ways the model differs from real lungs.
- Review: finish with Worksheet 4 on our respiratory system worksheets page or the respiratory system quiz.
Keep the setup simple and supervised. An adult should do the cutting, the cut edge of the bottle should be taped, and broken balloon pieces should be cleared away, because they are a choking hazard for young children.
Key Facts
- In a balloon lung model, the bottle represents the chest wall, the balloons the lungs, the straw the trachea and the rubber sheet the diaphragm.
- Pulling the rubber diaphragm down enlarges the sealed space in the bottle, lowers its pressure and makes the balloons inflate.
- The model demonstrates Boyle's law: when the volume of a trapped gas increases at a constant temperature, its pressure falls.
- A Y-shaped straw shows the trachea dividing at the carina into the right and left main bronchi.
- The model only works if it is airtight, so most failed models are fixed by resealing the bottle neck or the base.
- The bottle cannot show the ribs moving, and the balloons cannot show the alveoli or gas exchange.
- In the body, quiet breathing out is mainly passive recoil of the lungs, while the model needs the sheet to spring back.
Frequently Asked Questions
Why do the balloons inflate when you pull the diaphragm down?
Pulling the rubber sheet down makes the sealed space inside the bottle larger, so the trapped air there spreads out and its pressure falls below the pressure of the room. The inside of each balloon is still open to the room through the straw, so room air pushes into the balloons and inflates them until the pressures balance again.
Why does my lung model not work?
Almost every model that does not work has an air leak. Check that clay seals the straw tightly in the bottle neck, that each small balloon is taped airtight to its straw, and that the rubber diaphragm is taped all the way around the base. A very soft bottle that crumples when you pull can also stop the balloons from moving.
Can you make a lung model with one balloon?
Yes. Fix one small balloon to a single straw, seal it in the bottle neck with clay and add the rubber diaphragm in the same way. It shows the breathing mechanism just as well and is quicker for younger students. The two-balloon version adds the split of the trachea into the right and left bronchi, which makes it a better model of the anatomy.
Can I make a lung model without a Y-connector?
Yes. Cut two short pieces of straw and tape them firmly to the end of a longer straw to make a Y shape, sealing the joint with extra tape or a small blob of clay. Another option is to push two straws through the clay seal side by side, one for each balloon, although that makes it look as if there are two tracheas.
What grade level is the balloon lung model for?
The balloon lung model suits upper elementary and middle school students as a hands-on build and high school biology students as a demonstration of Boyle's law and the mechanics of breathing. Younger children can follow along if an adult does the cutting and sealing, while older students can be asked to explain the pressure changes and critique the model's limits.
How do you make a labeled respiratory system model for a school project?
Use a firm board as a base and shape the airway and lungs from modeling clay or craft foam, following a labeled respiratory system diagram. Include the nasal cavity, pharynx, larynx, trachea, bronchi, both lungs with their lobes, a cluster of alveoli and the diaphragm. Label each part with a small flag and add one line about its function.
What does the balloon lung model not show?
It does not show the rib cage moving, the dome shape of the real diaphragm, the thin fluid-filled pleural cavity, the spongy tissue and branching airways inside the lungs, or gas exchange with the blood. It also makes both lungs the same, while the right lung really has three lobes and the left lung two, and the left is smaller to fit the heart.
Keep Exploring


